Category Standards

CD Sheet Index

From General to Specific – Discipline Prefix to Sheet Number

A surprise. The CSI Uniform Drawing System orders sheets differently than the AIA ConDoc system, following more strictly in the order in which a structure is constructed.

Quoting from the AIA white paper:

Guiding principles include the following:

  1. Segregating information by discipline (both design and construction) to form subsets of the total drawing package
  2. Ordering the subsets to correspond to the natural sequence of construction, closely associating disciplines where topics are similar
  3. Collecting and presenting each drawing (plan, elevation, section) on a sheet dedicated to that drawing type (though different drawing types may be combined for small projects)
  4. Presenting information within each subset from general to specific

Discipline PREFIX

Architects are used to seeing their stuff come first, but ordering the set by the “natural sequence of construction” is rational.

PrefixDiscipline
GGeneral
HHazardous Materials
VSurvey/Mapping
BGeotechnical
WCivil Works
CCivil
LLandscape
SStructural
AArchitectural
IInteriors
EEquipment
FFire Protection
PPlumbing
DProcess
MMechanical
EElectrical
TTelecommunications
RResource
XOther Disciplines
ZContractor/Shop Drawings
OOperations

Sheet TYPE

Within each discipline, sheets are always grouped by type.

PrefaceDescriptionUsage Notes
000Generalproject data
symbols
key notes
general notes
100Plansbuilding plans: minimum 1/4" scale
site plans come under the L series sheets
200Elevationsexterior building elevations
1/4" minimum scale
1/2" for tricky areas
300Sections, Wall Sections1/4" min
1/2" preferred
3/4" for wall sections min
400Scaled-up plans, Sections, or Elevations3/4"
500Details1 1/2" details
3" details
600Schedules and Diagrams
700User-definedtypical detail sheets
800User-definedtypes that do not fall into other categories
9003D representations3D representations
isometrics
photographs

Sheet NUMBERING

Sheets numbers are built from five components:

Discipline – Type – Sequence – Sequence Designator (optional) – Supplemental Designator (optional)

Which in general produces numbers that look something like:

A-102-01-R1

Discipline

Per the CSI table above

Type

Per the Sheet Types in the table above

Sequence

Easy stuff – just a number. The sequence starts with 01 (not 00) and proceeds to 99. Such as:

A-102

Suffix

For sheets added after a numbering sequence has been established, Suffixes can be used. Such as:

A-102-01

Supplemental

Designators indicate revised sheets. “R” indicates a partial revision. “X” indicates a totally revised sheet. Such as:

A-102-X1
Buried Tolerance Toggle

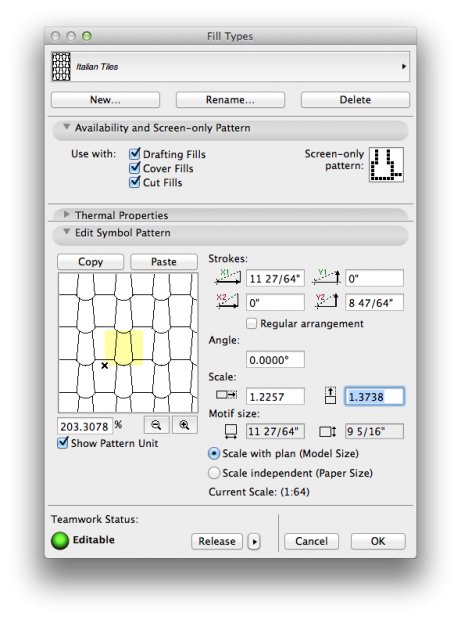
Stymied by lack of significant digits in library part, fill, or curtain wall dialog boxes?

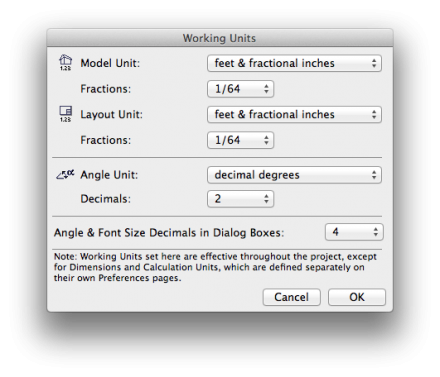
The fix is a Preference: Angle and Font Size Decimals in Dialog Boxes.

fill dialog

working units

Dimension Essentials

We admit the other dimension post here is completely over-wrought – not that you shouldn’t read it.

Meanwhile here’s a quick and effective how-to:

Framing Plans: General

Rules for framing plans.

A framing plan shows the following:

  1. The framing for the floor of the current story
  2. The load paths of the current story, in black (load-bearing walls, columns, etc).
  3. Supporting walls below the current story
  4. Partitions of the current story, in gray
  5. Plumbing, mechanical, and electrical fixtures that need to be coordinated with the structure, in gray
  6. Dimensions associated with the framing
  7. Layout lines, grid lines, and work lines (a structural grid if you’re using one, otherwise centerlines and alignments communicating design intent).
  8. Detail cross-references to framing and foundation details, and building sections.

Method

  1. Beams and girders. Model them on layer S-frmg.
  2. Joists and rafters. Represent them on the framing plan with 2-d fill 06 | Framing 16 and related fills, on layer S-frmg-2. If you need other spacings, just make another fill. Repetitive members of a floor or roof can be modeled for other reasons, (3d framing diagrams, sections and details) but we don’t typically use the modeled joists and rafters for the framing plan. Why? Because it is far easier and faster to symbolically indicate repetitive framing than to model it accurately enough for use in a floor plan.
  3. Dimensions: Indicate control points – where to start 16″ o.c. spacings.
  4. Partitions. No fill, separators shown.
  5. Bearing Walls. To show a bearing wall, draw a fill on top of it. This is a non-associated, additional element on layer +S-note.
  6. Annotations.
    1. All annotations should go on the layer +S-note.
    2. If you want an annotation to show in the foundation plan simultaneously, use +S-note-all.
    3. Use a background of pen 91 on text blocks to make them readable when placed on fills.
    4. Structure Notes. General notes such as loads, criteria, etc. are part of the General Notes PDF. Specific notes are added to the plans using text blocks.

Pens update

The pen set concept is a powerful one. Let’s talk about how to use pens, and pen sets, effectively.

Names: Navigator

How to keep the navigator organized? What is the naming system for viewpoints and views?

Names: The Project Folder

Boring but important: how names for file folders and files work, and where we put things.

Names: The File Name

Boring but important: how the naming system works. This post dovetails with The Project Folder post.

Dimensions: Ground Rules

“A great building must begin with the unmeasurable, must go through measurable means when it is being designed and in the end must be unmeasurable.”
Louis I. Kahn

Metiendo Vivendum – ‘By Measure We Live’
Motto of Sir Edwin Lutyens

Data Safety

We’re an office. We have stuff on hard drives. They go kaput every once in a while: count on it. Here’s the data protection overview.